What’s inside: Do you teach woodworking skills in your homeschool? Or is it a “lost art” for your kids? See how we approached learning woodworking with our group of homeschoolers during handicraft time. Life skills like this can build confidence in your kids in ways you can’t imagine.
Disclosure: This post may contain affiliate links. If you find my content valuable and make a purchase through one of my links, I will earn a commission at no cost to you, which helps me keep this blog going so I can help you even more! I recommend products I trust and/or use myself, and all opinions I express are my own. Read the full disclaimer here.
Do you think making stuff by hand is fun?
I do. Like basic woodworking.
Making stuff by hand is called handicraft in Charlotte Mason homeschools.
I remember learning woodworking skills when I was young. Because of my fond memories, I wanted to “pass it on” by teaching woodworking to a bunch of youngsters, including my three sons.
My Early Learning
My dad had a large and mysterious workbench full of interesting looking gadgets in our garage when I was growing up. Most of his tools were the old-fashioned hand tools like planes and vices and hand drills. Remember, these were the days before battery operated screwdrivers! But he did have this fabulous electric grinding wheel that would shoot sparks up to the ceiling when tools were sharpened. It was like our own personal fireworks.
Sadly, my dad never taught me how to use any of those magical tools.
We interrupt my story
Note to parents: teach your kids whatever it is you know! Especially if they are interested!
According to Forbes, shop classes are lamentably being ousted from most young people’s schooling. We need to correct that. A skillful citizenry benefits everyone.
Now, back to our story
Fortunately, I grew up in an era when girls and boys were beginning to get more opportunities in the traditional gender-based education – in other words, girls could take Shop (a.k.a an Industrial Arts class in which you learn woodworking or metal skills) and boys could take Home Ec. (short for Home Economics, which actually covers everything from fashion & interior design to cooking & sewing). I took them all, because what is more fun than building stuff or making an extra snack in the middle of the day?
I totally enjoyed shop class – learning to work the basic tools; learning hand woodworking. But I must admit, the pressure was on because my older brother had completed the same introductory course the year before I took it, and he produced the most beautiful napkin holder ever. He had a natural talent. He went on to an advanced class in which he made a gorgeous coffee table that my mother still has in her living room after 40 years.
How good was I when I first learned?
I stunk. Big time.
Although I enjoyed the class tremendously, my first effort at the napkin holder paled in comparison to my brother’s. It pretty much paled in comparison to any napkin holder ever made. But that’s ok! Looking back now, I realize that the first time you try a new skill, it doesn’t always work, but you’ll get better as you learn.
Getting better as you learn
According to Lifehacker, “Every time you learn something new, your brain changes in a pretty substantial way… Likewise, as you learn a new skill, the skill actually gets easier to do.”
I really agree with this idea. When I made three shaker-style chairs from a kit (where I had to sand & finish, assemble, and then cane the chairs). I stunk at the first one, but by the third, I was a master! Or at least I became someone who could build a chair from a kit.
I’m saying this to encourage you if you start learning a completely new skill like woodworking.
Fast forward to the present
Today, in my co-op group, I am privileged to be in charge of handicrafts. Mostly because I really enjoy making stuff and teaching others. One of the first handicrafts I suggested for the group to learn was woodworking. Later we went on to more wood projects.
And if you need ideas for woodcraft projects, I highly recommend Doug Stowe’s The Guide to Woodworking with Kids.
Safety first!
As my old shop teacher, Mr. Ayche, was famous for saying, “Always wear your safety goggles!”
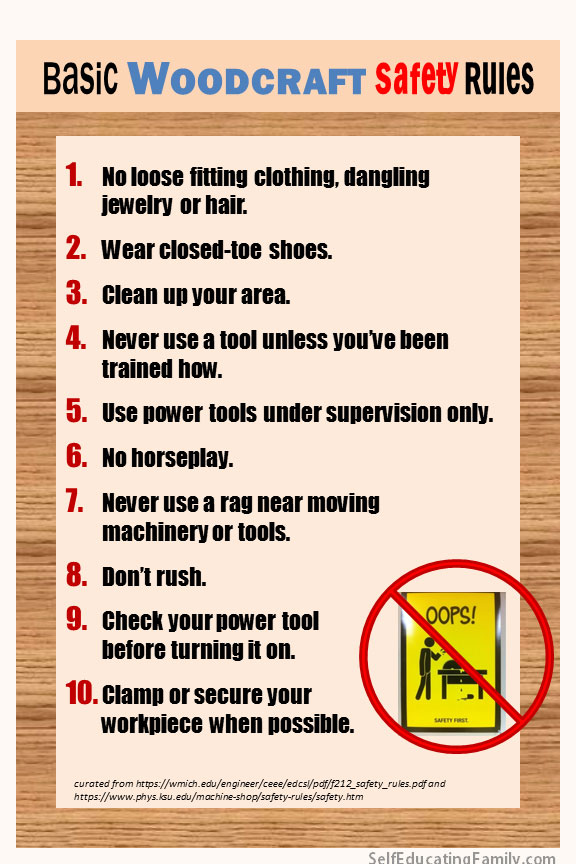
I can’t stress safety enough. I remember being told in college when we were learning how to use a band saw that I needed to have my long hair tied back. Which I appreciated. What I didn’t appreciate was the instructor’s follow up comment about the band saw being just like a sewing machine because he was looking right at me, the only girl in the class. I wanted to be a smart-alec and ask how a sewing machine worked, but I already knew how! And it is kind of like a band saw.
Basic Wood Craft Safety Rules
Here’s a good summation basic wood shop safety rules.[i] They’re important with big people and especially with younger people.
- Always wear your safety goggles.
- No loose fitting clothing, dangling jewelry or hair.
- Wear closed-toe shoes.
- Clean up your area.
- Never use a tool unless you’ve been trained how.
- Use power tools under supervision only.
- No horseplay.
- Never use a rage near moving machinery or tools.
- Don’t rush.
- Check your power tool before turning it on.
- Clamp or secure your workpiece when possible.
[i] Curated from https://wmich.edu/engineer/ceee/edcsl/pdf/f212_safety_rules.pdf and https://www.phys.ksu.edu/machine-shop/safety-rules/safety.htm
I can teach woodworking, but can you?
Yes, I’ve done woodworking for 40+ years and I was a mechanical engineer. Not completely over-qualified for teaching woodworking to youths, but definitely adequate, right?
But can YOU teach woodworking to a sixth-grader even if you’ve never picked up a hammer before? I’m saying you probably can. Especially if you start with an easy hand project. They say the best way to learn something is to teach it!
The protégé effect
So give woodworking a try. Or take a class together with your kid. Even if you don’t have a sixth-grader to teach, take a class with a buddy. And along the way, “teach” each other. You’ll learn more.
It’s called the protégé effect. According to Effectivology,
The protégé effect enables us to learn information better when we teach or intend to teach it to others, than when we learn it just for ourselves.
Scientists think it makes you categorize the important parts of what you’re learning as you learn in order to understand the key elements necessary. It’s not a new idea. 19th century educator Charlotte Mason (CM) used a variation called “Narration” a hundred years ago.
Our Group Goals for Learning WoodCraft
CM recommended handicrafts for structured free time in the afternoons after all school lessons were done. The goals were to spark interest and develop skills in areas in which the child could (eventually) produce something useful and beautiful.
Who’s in co-op this time?
When we were learning woodworking, we had 11 kids and 5 toddlers in our group. Some of the toddlers were VERY into tools, so we occupied them with basic skills (i.e. hammering stuff). They used child-sized hammers and got pretty good at it. The kids who were doing the actual wood projects we selected ranged in age from 8 to 15. One of the moms was especially excited because she wanted to learn how to use her jigsaw. Two of the moms enlisted their hubbies for the “homework” I assigned during the rest of the week and weekends.
What we wanted to accomplish
Our co-op group wanted to learn some basic skills, make a flower press, and make a planter. We were planning on learning gardening in the spring term, so the flower press and planters were going to be used right away. We also wanted all the kids to try the hand tools first, even if they ended up using the power drill or jig saw.
Here’s a list of the skills we identified for the class:
- Learning characteristics of wood
- Measuring & marking
- How to use a hammer
- Drilling holes, including pilot holes
- Cutting
- Screwing & nailing
Lesson 1: Introduction to Wood Craft
We started the series of classes with a trip to our local specialty lumber & millwork store for a tour. Where better to start learning woodworking? The knowledgeable staff showed the kids their milling shop and their lumber storage system, and even showed us their collection of exotic woods, pointing out features, grain differences and potential uses for each type of wood.
After that tremendous start, our next lesson got hands on with the safety rules.
I used my favorite wood projects book to be the basis of our instruction manual for our sessions: The Vegetable Gardener’s Book of Building Projects.
Note to self: I love this book, but I had forgotten all of the projects that were in it! When I re-read it to write this post, I found 2 different plans for compost bins – the very project I was searching for when I went on my library binge a few months ago!
My book had a sufficient introduction to tools so I used the topics mentioned as the foundation in our safety session. Once introduced to the safety issues and the tools, we let everyone experiment with hammering, drilling and sawing by hand on some scrap wood.
Lesson 2: The Flower Press
The next two sessions were spent on our flower presses. You can see how we made it and get a free printable at How to Make a Flower Press.
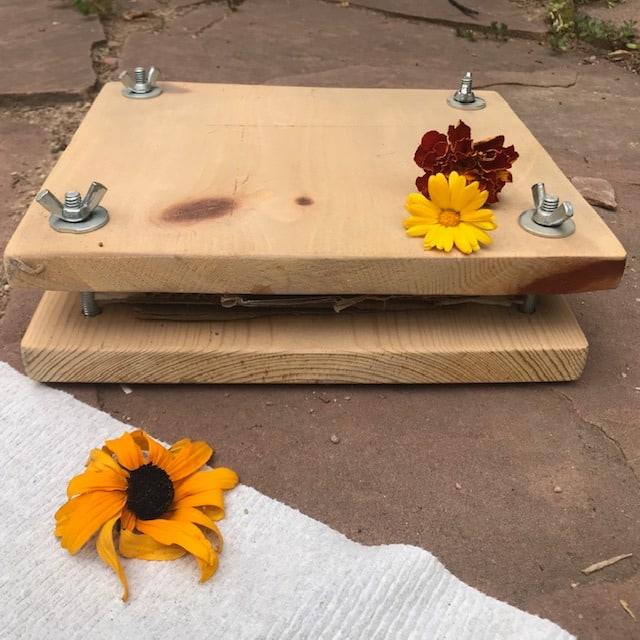
We divided this lesson into measuring & marking and drilling & finishing.
The key to measuring and marking is to remember the rule, “Measure twice, Cut once.”
For marking, we used T-squares, combination squares, and straightedges. We made sure everyone penciled their names on their pieces while marking. After the kids marked up their boards, we had the pieces pre-cut for everyone. I used my chop saw at home and brought cut pieces back for the second flower press session.
HANDY TIP
Did you know you can have the folks at Home Depot or Lowes cut your wood to size? It’s usually 2 free cuts and then some nominal amount like 50 cents per cut after that. As long as you don’t need super-precise cuts (like in the case of our flower press), you should be fine. It’s a great way to get started with woodworking.
In fact, I remember when I was ten, my mom had a wooden candle holder craft she wanted to make with me. We had my dad cut the circles for us and then we did the chiseling, sanding, staining and shellacking. So having someone else do your cuts for you makes it easier while learning basic woodworking skills.
Second session of Flower press
The second woodworking session involved learning to hand sand and learning to use power sanders. Once the kids saw that they could sand off their penciled names, they got the idea of how sanding removed that outer layer.
Then they moved on to drilling the holes, cleaning up the holes and assembling.
Flower Press Results
The kids did great with the drilling and finishing. By summer, everyone was pressing flowers that they had grown.
The kids drilled their holes in the first plate and then stacked the plates to drill the second holes. Everyone got a chance to use the old-fashioned manual drill. Everyone preferred the battery operated version. The littler kids all tried the battery drill under supervision, usually with a bigger person holding the drill – it can get heavy for little people.
Lesson 3: The Planter
For our planters, we wanted to have the kids work on sawing. Most of the boards we pre-cut to length, but we left a few for them to try their hand at using a regular hand saw. The planter design itself called for the use of the jigsaw for some curved cuts, so all of the bigger people got instruction in how to do that and they cut for the little people.
We actually ran out of time in our last two sessions, so most everyone assembled and finished their planters over the winter.
What I found most interesting in the finished planters were the differences in how everyone’s final product turned out. Same planter, diverse looks. I should have suspected that would happen since my wonderful book prominently shows the same planter with four different looks at right at the beginning.
Lessons Learned
Overall, our group made a lot of useful objects and we had a lot of fun. Some of the kids have gone on to make more woodworking projects, but one of the most important parts of our lessons was just letting the kids know that they could do this. They’ll keep that in the back of their minds until one day when someone gives them a power tool and then they’ll look for things to start making.
I asked my kids what they remembered most from our woodworking projects, and my youngest yelled, “Don’t forget your safety goggles!”
If you liked “Learning Woodworking,” pin it!