What’s inside: You’ll find key points about handicraft and how to apply two key ideas: “Staying within the compass” and “No pea and stick work.”
EDUCATION IS THE SCIENCE OF RELATIONS; that is, that a child has natural relations with a vast number of things and thoughts: so we must train him upon physical exercises, nature, handicrafts, science and art, and upon many living books.
— Charlotte Mason (CM)
Disclosure: This post contains affiliate links, meaning that if you make a purchase after clicking through, SelfEducatingFamily will receive a small commission at no extra cost to you.
4 Key Points about Handicraft
- Keep it within the child’s compass. This is both a Sloyd principle and CM principle.
- Not pea and stick work.
- They should be taught slowly and carefully.
- No slipshod work.
The question is: How do I proceed slowly and carefully while my child gains skills and stays “within the child’s compass”?
For instance, you can’t ride a bicycle without learning to balance and you can’t learn to balance a bicycle until you ride it, so we often just lift our kids up on that bicycle and shove them crashing off into the world. Did you really do that slowly and carefully? Were you carefully helping while the concepts were digested? Or better yet, can you provide a better way to allow independence without brutally crashing, for instance with a pedal-less bike to learn balance.
It’s just an example not related to handicraft to help you think what your child can do.
1st of Key Points for Handicraft: Within the compass
This phrase “within the compass” means that the skill being learned is CLOSE ENOUGH to the skills the child possesses that they can do it. Challenging enough to be a goal, yet not too challenging that it can’t be done and the child gets frustrated.
Pea and stick work
A child knows when the desired goal is dumbed down. “Pea & stick” work is like mindless worksheets or busywork. Placing the macaroni onto the paper with glue is “pea & stick” work.
Don’t give them pea & stick work.
Good News for teaching handicraft!
The good news is that by staying within the child’s compass and not giving pea & stick work, i.e. by challenging the child just enough and keeping real skills within reach, you too can learn the skills if you don’t have them.
And remember, you are a homeschooling parent – you can do it!
I think the interesting thing that Charlotte Mason discovered when first incorporating Sloyd in her schools is that she found that expert woodworkers were not as good at teaching children their skills as teachers trained in the same skills.
Were those teachers experts at the skill? No!
Those teachers were just good at how to teach, observed their children, and recognized when to direct a child to the next skill.
Careful, not slipshod
By taking care with the work, the child uses his power of attention to complete the task and learn the skill. Skills and tasks increase in complexity as the child progresses.
Taught slowly & carefully
While new skills are taught slowly and carefully, the goal is to allow the child independence in learning. They are working at being independent learners.
Remember too that handicraft is not exactly “taught” by the teacher – avoid lectures! Demonstrating new concepts is appropriate, but micromanaging is not.
Laying out the scope of the task is appropriate, especially if you have samples of what is the goal.
A gentle reminder about careful work when first starting is acceptable, but nagging is not. More appropriate is making sure the child is self-correcting without being overly-perfectionist.
The child should be able to move towards the goal independently in handicraft. Practice is necessary, and we all know that the first time you try something, it often doesn’t work as expected, but by the 10th time, you can usually do it much more capably.
Again, we know that the human hand is a wonderful and exquisite instrument to be used in a hundred movements exacting delicacy, direction and force; every such movement is a cause of joy as it leads to the pleasure of execution and the triumph of success. We begin to understand this and make some efforts to train the young in the deft handling of tools and the practice of handicrafts.
—Charlotte Mason Home Education Vol 6 p 327
How does this work?
1. Break down the skills
Take the handicraft subject and break down the skills needed.
If you’ve never done this, you want to think smaller than usual — what’s the first smallest piece of skill that I need to learn? You can also skim one of the old sloyd books which list the models that the kids were to make. Here are some links:
- Sloyd by Everett Schwartz
- Manual instruction: Woodwork (the English sloyd) by S. Barter
- Hand-Craft: The Most Reliable Basis of Technical Education in Schools and Classes by John Sutcliffe
- Paper Sloyd: A Handbook for Primary Grades by Ednah Anne Rich
These are old manuals in the public domain that show a progression of model building. It gives you an idea of what they meant by slow and careful teaching.
2. Match the skills to the child
New skills need to be appropriate to the age and maturity level of the child.
This is not a simple task, but you can manage this. It is key that the child learns to work independently. This doesn’t happen overnight, but continue applying learning habits like full attention to the tasks at hand.
Note: if you have multiple children, you have to direct them appropriately. Many times the whole family can work on the same handicraft, yet older children will need more challenging goals in the same craft.
Ideas for different ages
Also keep in mind that older children will have the benefit of more years of learning a handicraft. They may not want to revisit chair-caning when your younger kids learn it. It gives an opportunity for something more advanced like wood burning. And older kids certainly should not revisit learning their stitches in a sampler if the handicraft is sewing. They need to move on to more challenging sewing projects.
And toddlers must be kept occupied.
Remember that children under age 6 are not expected to be doing formal lessons. Yet YOU KNOW that if you pick up a hammer to do a woodworking project, your 5 year-old will be right there to help. Be ready with safe and related occupations. If your older kids are taking up wood carving, begin soap carving with your younger.
One more note: if you are trying a new handicraft that will be age appropriate for your younger children, but your teen learner has never tried it, you can have them learn at an accelerated pace while your younger moves slowly through the projects. For instance: origami (a form of paper sloyd). If you get a good origami book, the younger child will complete the first model, while the older one will complete several models in the same time. Caution here is to make sure the older child is still executing with care.
Practical Examples
He practises various handicrafts that he may know the feel of wood, clay, leather, and the joy of handling tools, that is, that he may establish a due relation with materials.
—Charlotte Mason Home Education Vol 6 p 31
For an abundance of what handicraft to teach, read the post 90+ Ideas for Handicraft. Select any of these and keep in mind all of the key points for handicraft we’ve been discussing.
For cooking skills, see the post on how to teach cooking skills to your kids for ideas with multiple ages of kids.
Clay modeling or cardboard sloyd
We do what is possible to introduce children to Architecture; and we practise clay-modelling and the various artistic handicrafts, but there is nothing unusual in our work in these directions. – CM Vol 6, p 216
Clay modeling is another great handicraft that can be adjusted for various ages in the family. Modeling (including sloyd) was used for projects inspired by literature and history readings. An older student might make a 3D model of the Coliseum out of clay, while the younger might make a playdough model of the earth’s layers.
Sewing
Sewing skills can be improved every year. Beginners learn to thread needles, to sew basic stitches on a sampler, to replace buttons, or to embroider a small design. Advanced skills might include sewing a baby layette for gifts or charity, making pot holders and aprons, and eventually sewing complete outfits or expanding broadly to slipcovers or curtains.
Projects can be selected based on interests and challenge.
Weaving
CM included chair caning as something easy enough for 6-9 year olds. We don’t do much chair caning today, but it is still a fun craft.
A long time ago, I got a shaker chair kit and I had to cane the seats from a cotton strapping. By the third chair, I had the method down! Your older child may find that interesting. The younger children might enjoy the “loop potholders” type of weaving, and can learn some terminology and techniques. I actually still enjoy making those – and they are a fun gift.
Key Points for Handicraft
- Keep it within the child’s compass.
- Not pea and stick work.
- They should be taught slowly and carefully.
- No slipshod work.
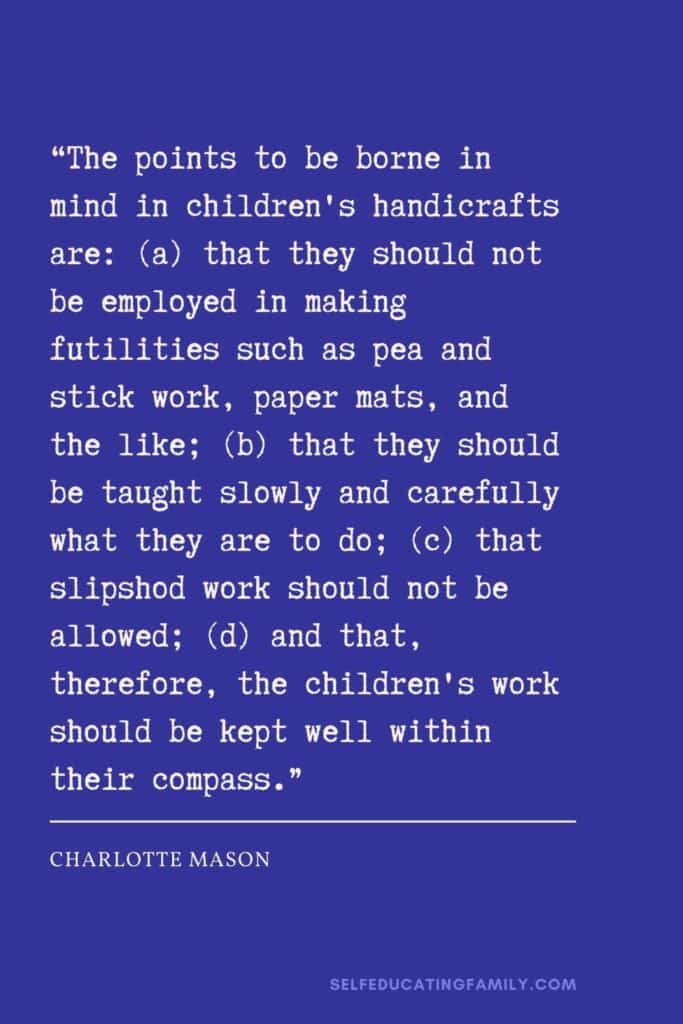
Handicrafts and Drills.––It is not possible to do more than mention two more important subjects––the Handicrafts and Drills––which should form a regular part of a child’s daily life… The Handicrafts best fitted for children under nine seem to me to be chair-caning, carton-work, basket-work, Smyrna rugs, Japanese curtains, carving in cork, samplers on coarse canvas showing a variety of stitches, easy needlework, knitting (big needles and wool), etc. The points to be borne in mind in children’s handicrafts are: (a) that they should not be employed in making futilities such as pea and stick work, paper mats, and the like; (b) that they should be taught slowly and carefully what they are to do; (c) that slipshod work should not be allowed; (d) and that, therefore, the children’s work should be kept well within their compass.—CM Vol 1 p 314
Need more?
I’m giving a workshop at the Life Skills Leadership Summit on the importance of handicraft for building character. It’s called Visionary Education, so be sure to watch for me!
You’ll also find easy ways to add purpose, thinking skills and real life skills at the summit from February 24-28, 2025.
Grab your free Basic Pass here and you’ll get all sorts of real, PRACTICAL advice from 30+ expert homeschoolers, 50+ workshops & $600+ in Swag.
Related Posts


Keep Learning
- Simply Charlotte Mason | Handicrafts and Life Skills
- Classical Charlotte Mason Handicrafts | Handicrafts (includes a comprehensive list of links to how-to’s
- Ambleside Online | Handicrafts