
What’s Inside
Growing microgreens as a handicraft
Have you ever learned how to grow microgreens? A great handicraft to learn by yourself or with your kids is growing microgreens.
This article looks at using microgreens in your gardening handicraft for homeschooling. Also, this article focuses on the mechanics of how to grow microgreens.
A follow-up article will contain specifics including lesson plans on how to grow microgreens with kids over the course of a semester – three months – as part of a Charlotte Mason-style handicraft skill.
What are Microgreens?
Microgreens are tiny shoots of immature edible vegetables that are packed with nutrition. If you compare microgreens to sprouts, then you can get a good feel for what is a microgreen.
Sprouts vs. Microgreens
One year, we had a sprouting lesson in our gardening handicraft. We made our own sprouting jars (free printable in the library!) and learned to sprout seeds.
I always thought sprouts and microgreens were more or less interchangeable. That’s WRONG!
Sprouts are just the little buds of a tail that comes out of a seed, whereas microgreens will always have those first little cotyledon leaves.
In short, microgreens are tiny, immature versions of the mature vegetable, and often have similar flavor profiles.
| Comparison of Sprouts vs. Microgreens | |
|---|---|
| Sprouts | Microgreens |
| Take fewer days to being ready | Longer time before they are ready |
| No soil | Require soil |
| No light | Needs light after sprouting |
| Very good nutritionally | Also very good nutritionally |
| Super easy to grow | Easy to grow |
Why Grow Microgreens?
I took up microgreens because of winter.
We eat salad every day, but sometimes winter lettuce looks so sad! In addition, I was getting advice from several different directions touting the superb nutrition of sprouts and greens. Folks were saying microgreens can have up to 40 times the nutritional punch as the mature version of the same vegetable.
40 times!
This includes vitamins like A, C and K – depending on which seed you are planting.
So I felt like microgreens should be a necessary nutritional addition for winter – right up there with fermented products like kimchi or sauerkraut.
The process of how to grow microgreens
Basically, you get some soil or substrate of some kind and place the seeds on top of the soil. Water, then put them in a window when they start sprouting, keeping the moisture levels even the whole time, until they grow to the desired size. Cut, eat, enjoy.
Sounds easy enough, right?
When I first was learning about microgreens, I treated my learning process like a science experiment. In the same way, you can too if you use the lesson plans I’ve created in the follow up post.
After going through several dozen variations of growing microgreens, I can now consistently make fantastic radish sprouts. Here’s how I did it.
Steps to learn about growing microgreens
Step 1: Research
I read several dozen microgreen “how-to” books and blogs. If I only had 2 sources to use, I would choose these favorites which I found the most useful.
Note: These are affiliate links.
Favorite Book

Cooking with Microgreens: the Grow-Your-Own Superfood by Sal Gilbertie and Larry Sheehan.

The first part of this book is jam-packed with how to information, including my favorite part – the reference chart for Sowing and Harvest Guide of more varieties of seed than I could imagine. Read Part 1 of the book completely. You can glance at Part 2, which has recipes for how to use microgreens if you need motivation. I found the book in my local library, but I may need to get it as a reference book for my home library.
Favorite Website
Bootstrap Farmer: Ultimate Cheat Sheet for Microgreens and Learn to Grow Microgreens 101. Go through the 101 instructions and refer to the cheat sheet as needed.
Reviewing these two sources, even if you do no other research, should get you well on your way for a strong background for what you need to know for how to grow microgreens.
More Research caution
If you do want to do more research, I’ve provided a list of some other recommended sources at the bottom of this article. But I’d like to caution you against too much research.
Confession: I am an over-researcher. I think it’s a form of procrastination mixed with perfectionism. Instead, try to use the 80/20 rule applied to learning. In a nutshell, 80% of the output comes from 20% of the inputs.
I’ve tried to pick the 20% of the inputs for you when it comes to microgreens to get you off to a good start.
Step 2: Gather Supplies and Equipment
You will need:
- Seeds (see step 3 for selection choices)
- Substrate (soil or soil-less medium to grow in)
- Trays or containers, with holes in the bottom (works best)
- Water: nice, even moisture
- Light
Step 3: Select seed
Generally, pretty much anything that grows as a vegetable can be grown as a microgreen.
That said, some things are easier to grow than others. So do yourself a favor and start with the easiest.
Easiest seeds to grow as microgreens
Bootstrap farmer recommends starter seeds of “broccoli, pea, radish, sunflower, purple kohlrabi and clover.” Gilbertie and Sheehan agree with peas and sunflowers and consider many of the greens as easy – like mustards, pak choi, arugula, kale, mesclan and cress.
I, naturally, started by experimenting with whatever I had on hand – meaning leftover seed from previous years of gardening.
WAIT!
What? You used old seeds? What about viability rates?
Yeah. That’s totally a thing. My first trials were epic FAILS! I had some germination rates as low as zero percent.
Learn from my mistakes
I had assumed that 1-year-old seed could be 3 times as low in germination rate, so I just used 3 times as much seed. Likewise, if the seed was 6 years old, I would use like 10 times as much seed.
This method actually works when making seed blocks for seed starts. You get one good seed and who cares about the rest since you have to thin them to 1 anyway? One seed grown sprouted in a seed block and you are good – it’s probably one super strong seed anyway.
But microgreens require dense seed sprouting density. The little sprouts and seedlings actually hold each other up as they grow really close – it’s part of how they grow. If you don’t have enough seed density, the seedlings will flop over and be stressed.
So, save your old seed for seed starts, or even better – chicken food.
And also, this is completely good news for you that I made this crucial error because you will learn from my mistakes! Use seed that is fresh.
My seed source
Next, I bought a few packets of seeds to test varieties that worked for me. This is a great approach to get started with. You can test ease of growing and flavor profiles for a low budget starting cost.
I basically tried about 10 different seeds and came up with what I like best for microgreens – radish. I liked broccoli and mung beans better as sprouts, but broccoli is OK as microgreens too. I’m still undecided about sunflower seeds – they were wonderful as sprouts, but really good as microgreens too. I did not like the “salad mix” seed packs for microgreens – the germination length between the seeds that were included varied too much and so I felt they didn’t work as microgreens. They work fine for sprouts.
Now that I settled on WHAT seeds, I wanted to find a better source for inexpensive, organic radish seeds. Buying them in the little packets seemed to be way too expensive – each packet costs between $1 and $3 and only makes one little 5″x 5″ tray (more on the trays below).
My hands-down favorite source for bulk microgreen seeds is Azure Standard. If you are not a member, consider joining. They deliver to drop sites in many states.
A “side trip” to Azure Standard to get seeds
Azure Standard is a fantastic, family-owned food distributor for healthy organic, bulk, natural and non-GMO foods. They deliver direct to you via a community drop instead of a middle man and so have affordable and competitive prices. I’ve totally enjoyed getting to know local people at my drop while picking up my bulk supplies for baking, for food storage and for chicken feed. I’ve even used them for some garden starts when my seedlings didn’t thrive, and to test out unique heirloom varieties of tomatoes. I’m a bit of a tomato variety fanatic!
I like Azure Standard for bulk foods much better than giant places like Costco because I like supporting family businesses and I think the experience is warmer – I always found the giant stores oppressively large.
How Azure works
You have to sign up as a customer first to make an account to order from.
After I did that, I place an order before the next cutoff date and I drive to my local pickup location a few days later. The folks at the truck help unload and sort to get each person’s order. My drop comes once a month.
If there’s ever an issue with an order, the folks at the customer service department are super-agreeable and helpful. I only mention this because we had some issues just after one of their warehouses burned down and the supply chain system was struggling. But, as I said, I have had nothing but positive experiences with ordering from them. Plus, I really like their catalogs and newsletters – lots of homey and useful information.
If you sign up through my link I get a one-time signup bonus. You get bonus “Azure Bucks” for everything you buy to use the next time you buy.
Check out Azure for your bulk food needs.
Read the rest of the review for Azure here.
Back to how to grow microgreens
Choosing Seeds
I now buy the 1 or 5 pound bag size of seed. Because each 5”x 5” tray I make only takes about a teaspoon of radish seed, I have plenty of seed. My favorite microgreen varieties are broccoli, clover, and radish.
Here’s some cost math
- Paid $7.18 per pound of seed (16 oz.)
- A teaspoon of seed weighs about 0.15 ounces
- That’s 106 teaspoons per pound of seed. I’ll round down to 100 because it’s a nice round number.
- 100 5”x 5” trays of microgreens per pound of seed
- Each batch costs $0.07 to grow (material costs – no labor or energy costs included!)
- I had a recent yield from one tray of radish microgreens of 1.58 oz.
- Azure is selling radish microgreens for $8.25 for 4 oz. And they have a good price!
- You can grow 4 oz. for under $0.20 – nice savings!
Step 4: Choose growing medium
I experimented with soil mix, coconut coir, and paper towels as a growing medium. In this case, I used all new radish seed in three separate trays and did everything else the same.
| Comparison of Soil Medium | |
|---|---|
| Medium | Germination Rate |
| Soil mix | 95% |
| Coconut Coir | 90% |
| Paper towel | 2% |
Obviously, the best performance came from the soil mix as shown in the above table. I make my own mix with a modified “Mel’s Mix: Square Foot Gardening” recipe, substituting perlite for the vermiculite to save on costs. So my mix is approximately 1/3 peat moss, 1/3 compost and 1/3 perlite. I use that much perlite because I live in the semi-arid high desert where our average humidity is 50%.
Coconut coir, while giving very good results, is much more expensive than soil mix. If you could somehow reuse it, maybe I could justify the cost.
I could not get the paper towel trick to work, but you could try it for experimentation’s sake. See further study below. I think my seeds dried out. But that proves my point – soil mix is easier if you have troubles remembering to water your plants!
After clipping my ready-to-eat microgreens, I will toss the spent soil and roots to my chickens. They love it, and then scratch it in to the compost bin, which I have in their run. If you followed my library binge, I did actually end up building my compost bin – it turned out to be a 1-bin system, instead of the 3-bin that I was researching, but I can always expand.
Step 5: Prepare containers
Your containers MUST have bottom watering capability. This can be as simple as a recycled plastic pint clamshells (like the kid for cherry tomatoes or strawberries) or some other DIY method of container. Lots of ideas are out there. See my list of resources below for more ideas.
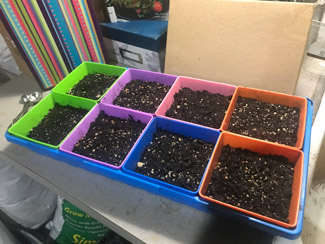
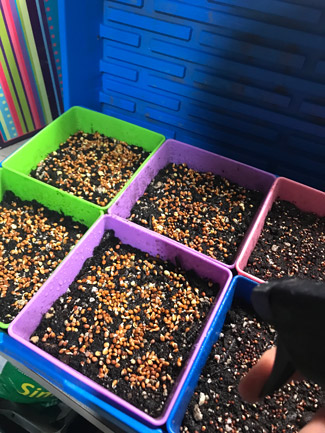
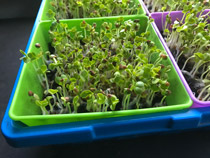
I have settled on the standard 1020 gardening trays (which measure 10” x 20”) with 5”x 5” insert trays. Besides giving a standard size, which helped control the variables as I was experimenting, the insert trays are a perfect size for how many microgreens I want at one time.
I actually had these beautiful trays from Bootstrap Farmer already because I splurged and bought myself some for a birthday gift. I was sick of those plastic 1020 trays that inevitably crack mid-season. And I love my new trays! They are so super sturdy. And colorful. And the insert trays worked great for the microgreens. Bootstrap Farmer actually sells specific microgreen trays which are shorter – only 1” deep instead of 2” deep like standard trays. I just filled the trays to 1” deep – it makes it a bit harder to clip the tiny greens like clover or broccoli, but it’s not a hardship.
Fill trays with mix
Fill your trays with soil mix.
Make sure your soil mix is moist. Meaning, it has to be completely soaked through, but not dripping. Peat moss is notoriously absorbent and can leave pockets of dry spots. Accordingly, I like to dump some warm water in and over my tray and leave it overnight. That way, you can tell if it is fully saturated. Simply dump off the excess water the next day. The soil should feel like a wet sponge, but not too wet.
Squish down your soil flat. I like to use my little squares to help flatten the soil mix surface. The seeds will reside on top of the soil, so you want it to be flat.
Step 6: Scatter seeds on soil mix
The seeds will be very close to each other. This is not like sowing seeds in your garden. Seed charts or calculators are helpful to determine how much seed per square inch.
I read on one of these calculators that you need 10 radish seeds per inch, but my actual results use closer to 14-28 seeds per inch range.
If you are talking about microgreens in general, seed diameter is the biggest factor in how much seed to use – the bigger the seed, the fewer seeds per inch.
So, my ultimate ratio for radish seed was a generous teaspoon of seed per 5” x 5” tray.
Step 7: Water and Cover
Spritz the seeds with a spray bottle of water and give them a little squish down onto the soil. I used a stacked tray to gently push the seed down a bit. This added soil contact helps moisture absorption by the seeds.
Note: some larger seeds, like sunflower seed or peas, do best with a pre-soak before putting on the soil.
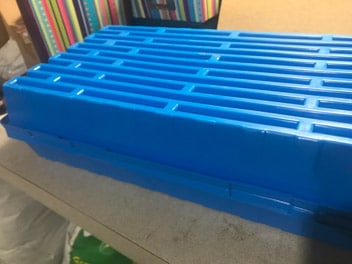
Cover the tray. I found that darkness for the first few days before germination, helped get the seeds sprouting evenly. Everyone recommends darkness while the seeds are starting to germinate.
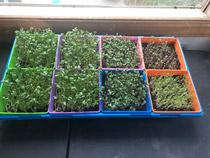
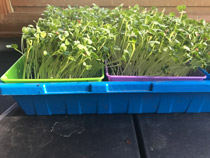
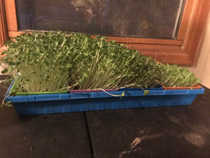
My setup used 8 – 5”x”5” trays with holes in the bottom in a 1020 watering tray. For a cover, I just used an extra upside-down 1020 tray.
Step 8: Keep evenly moist
Every day, peak at your trays to make sure they are still moist. If more moisture is needed, you can spray the seeds with a misting bottle.
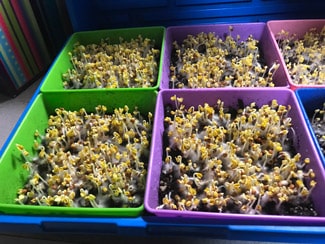
Step 9: Light!
Once a good number of the seeds sprout, you can remove the cover and begin bottom watering. Discontinue spraying – it knocks over the tiny sprouts.
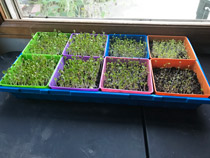
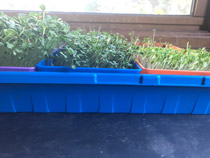
Microgreens can grow under lights or in a sunny window.
I’ve tried both ways. And I’ve used heat under the grow lights. Most seeds did not need heat. Think about it – if the seed you are sprouting is a cool season crop, then it doesn’t need heat.
Radish does not need heat to sprout.
Remember to still keep evenly moist the whole time.
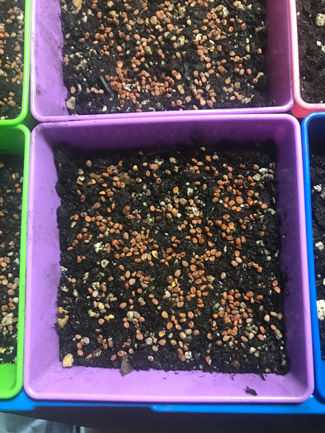
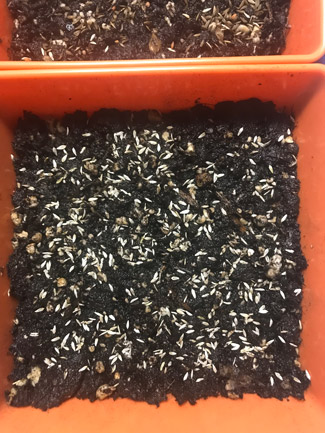
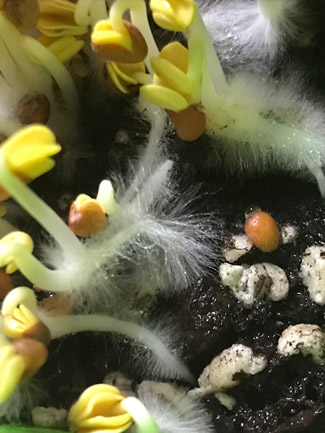
Warning about root hairs
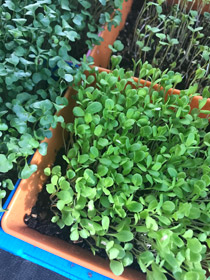
The first time I saw white fuzzy stuff all over my seeds, I was despondent. “Mold!” I thought. But it turns out NOT MOLD! The white fuzz is at this stage is usually root hair. Because the seed is on the surface, you get the privilege of seeing the little hairs that come off of the sprouted root trying to get water from the soil. Radish seed is particularly susceptible to getting visible root hairs, but if you look closely at my Day 2 photo in the upper right corner, you can see that my broccoli seed is also showing root hairs.
Root hair is completely normal and OK. Just keep going.
Step 10: Harvest when ready
When you see your microgreens have grown to the right size, you can clip your harvest. The time it takes depends on the seed.
Radish is one of the fastest growing crops. Indeed, radish can be very satisfying for kids or impatient gardeners And microgreens are a fast growing crop in general. Great for urban or suburban gardeners!
Cheat Sheet for growing microgreens
Next, since you’ve got the background on what you are going to do, I’ve got a handy step-by-step guide for how to grow microgreens for you to get going. And in the follow-up article, I will have a lesson plan guide as well.
You can print this cheat sheet by clicking on the button below.
Tools & Supplies
- Containers (with holes for bottom watering) to hold soil
- Trays to hold containers to hold water when watering
- Soil
- Seeds
- Measuring spoon
- Mister (optional)
Before you begin
- Prepare seeds, if necessary, by pre-sprouting large seeds (e.g. sunflowers, peas, mung beans).
- Prepare soil mix by soaking until evenly moist the night before you begin.
- Gather necessary supplies and tools.
To Plant Microgreens
- Prepare containers: Put 1” of moist soil mix into trays and tamp down until even and flat.
- Scatter seed on surface of soil. Tamp down evenly to make good contact with soil.
- Cover to keep out light.
- Check every morning.
Check Microgreens for sprouting
- Each morning, check moisture levels and sprouting condition. Touch the soil with your finger to determine moisture if you can’t see by observation.
- If seedlings have not emerged, then spritz with water and recover.
- If seedlings have emerged, then uncover, place in light and begin bottom watering.
- Each morning once emerged, give a drink of water from the bottom by pouring water in to the tray and letting the container of sprouts soak up the water. If water still puddles after an hour, dump off excess water.
- Grow until ready to harvest.
To Harvest
- Finally, clip and eat. No need to rinse if you clip carefully.
Related Posts


How to grow microgreens
- Rose Hill Farm
- Wellness Mama
- Bootstrap Farmer: Ultimate Cheat Sheet for Microgreens
- Bootstrap Farmer: Learn to Grow Microgreens 101
Nutritional Information
80/20 rule
Yields and Calculators
- Yield per tray
- Seeds per pound chart
- Seed calculator
- Seed density calculator
- Seeds per ounce
- Seed density
Soil and other substrates
- Mel’s mix square foot gardening
- Paper towel medium
DIY or inexpensive containers for growing
Bottom watering
Seed Sources
- Azure Standard
- Ohio Heirloom seeds
- Johnny’s Seeds (haven’t tried yet, but I’ve heard good things)
- TrueLeaf Market (ditto)