What’s inside: Clay modeling ideas and inspiration for rainy day handicraft. We’ll look at simple beginner demonstrations where you may find your next handicraft.
This post may contain affiliate links. If you find my content valuable and make a purchase through one of my links, I will earn a commission at no cost to you, which helps me keep this blog going so I can help you even more! I recommend products I trust and/or use myself, and all opinions I express are my own. Read the full disclaimer here.
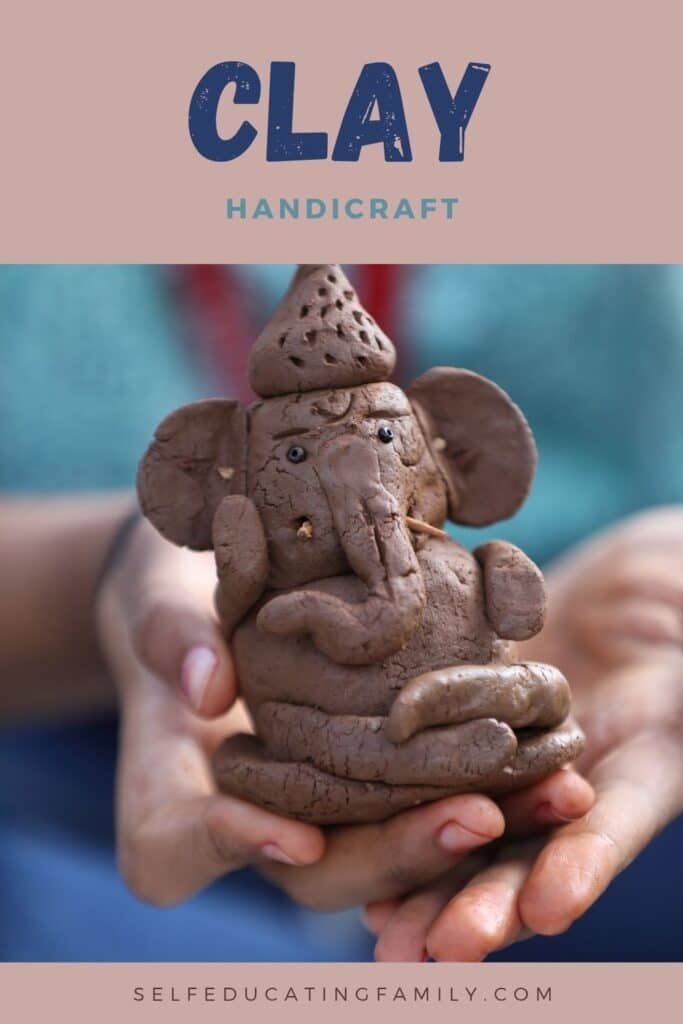
Handicraft: Beginner Clay Modeling
My youngest son started experimenting with clay when his aunt got him some modeling clay. He set about “improving” his Lego minifigures by adding clay accessories and then repainting the minifigs to be a new character.
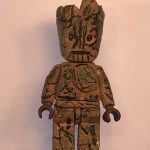
This hobby expanded into free form sculpting of minifigures and of painting minifigures.
He still enjoys it to this day, although his YouTube channel has been neglected while he is studying mechanical engineering in college.
How can I start Clay Modeling as handicraft?
Handicraft time in Charlotte Mason homeschooling is a fabulous opportunity to explore new and useful things to make by hand – new skills to learn.
And clay modeling is a good handicraft because there are many aspects of it that force the student to pay attention and use judgment on how a model looks – especially with curves involved.
How do handicraft principles apply to clay modeling?
Remember the key concepts:
- Stay within the child’s compass
- Build skills slowly
- No slipshod work
- Have the child evaluate his work
Let’s get started.
1. Know your clays
From traditional clay to today’s modern clays, if you hit a craft store you may get overwhelmed by the choices. Here are brief pointers.
Traditional
- Traditional clay is what you think of when you see a potter throwing a slab of clay onto a potter’s wheel. It has to be baked in a kiln at high temperatures to cure. In general, unless you are taking a class where you can use professional equipment, you probably aren’t starting here.
- Fun side note: When I was little, someone gave me a little battery operated potter’s wheel. It was very fun. Later in (public) high school, the art room had a real wheel which worked much better! Better torque on the wheel yields a better finished product. Not that my finished products were any good, but they were enjoyable.
Modern
- Polymer clay are the newer clays that can be baked and hardened in an oven. The clay stays pliable until it is heated. Sculpey and FIMO are brands you might see at the hobby store.
- Air dry clays are easy to use and will harden in air over time. Claymoo is a typical brand.
- Modeling clay comes in both air-dry and non-drying. Be sure to read the label to make sure you are getting what you want.
- Play dough. Either the name brand or make-your-own. I always liked to make a batch because I never liked the smell of play dough. If you make your own, you can put in whatever scent you like. You can also make your own hardening clays (kind of like a flour and water dough with food coloring). Just bake to harden – I remember making decorations to hang in windows using cookie cutters to shape the dough.
Your selection depends on what you are trying to do. You may need more than one kind too – that homemade playdough option is great to keep the little ones learning while the more advanced kiddos can be using the polymer clays for more intricate projects.
Some example first lessons
A motor car
Here is an excellent resource for a first lesson in sculpting by Master Sculptor Chuck Oldham. He makes a car using blocks and shapes that most kids should be able to follow along with.
His associated website Learn Sculpture has many guides that can be a follow up for next lessons.
The pinch pot
Art teacher Trista at Art with Trista talks about the importance of the pinch pot and the how she’s taught every student at all ages how to make this. She shows why the pinch pot is foundational for clay modeling and why she starts with it in first grade.
Trista also has a video on the Clay Funny Face, which should be done after the pinch pot. In it, she introduces the concept of “slip and score” to attach pieces together. She does this in second grade, after the pinch pot in first grade.
For more advanced pinch pots, Karans Pots and Glass YouTube channel has “beginner” playlist for clay modeling. She uses real clay and has many inspirational ideas. Amber, The Heritage Mom suggested this resource after she had tried a more traditional Charlotte Mason Sloyd-style book on Clay Modelling. But her kids balked at the first lesson because it was too slow – she ended up using the book but only after some exciting lessons from this online teacher.
Cassandra at A Beautifully Wrecked Life was able to use the book by Unwin and gives some nice pointers on storing modeling clay.
The coil pot

The coil pot is often the next beginner lesson.
The craft store Baker Ross shows instructions for a simple coil pot and for a more decorative coil pot. Many times, craft stores are excellent sources of project ideas.

These first lessons
So I recommend the pinch pot, the coil pot, using the slip and score to attach pieces, and using block shapes to rough out your model as the essential first lessons in clay modeling.
Next Lessons
Once you get going on making some simple things, select some projects that keep the skills growing and maybe tie in to some of your other lessons.
For instance, in numerous end-of-year projects, students at the Ambleside schools were supposed to make a model of something from their history lessons – a memorable building or a battle, for example. Without being specific, suggest that they can choose to make a model from something they are reading about. See where your child takes it.
I remember my twins making their famous duct taped models of the Monitor and the Merrimac (with rotating turret.) I didn’t suggest that – they came up with the whole project on their own when we were studying the time period.
Or, if you are studying a particular country, try these DIY clay maps from Moms and Crafters.
We also made a clay model of the earth’s layers the year we learned about that in science. There are lots of tutorials on that one. It’s a fun craft. We used non-drying clay and then sliced into the earth when it was complete with oceans and land on the outside. It’s a bit hard to make it to scale, but we tried. Navigating by Joy has a nice description of the craft.
Good luck in your handicraft!
Keep on Learning
Related Posts


FAQ
If you want to get started using the basic techniques, learn to make a pinch pot; use blocks to shape out a piece; learn to make a coil pot; and learn to use the “slip and score” technique to attach pieces. Or you can use a book that breaks each skill down even further, like Clay Modelling by Hermione Urwin.
The pinch pot is an excellent beginning point.
Homemade playdough is the easiest modeling “clay” for beginners! Polymer clays are fun for their bright colors and ease of use. Traditional modeling clay is good to learn techniques and skills. It depends how old you are.